Hi, friends! Welcome to Installer No. 127, your guide to the best and Verge-iest stuff in the world. (If you’re new here, welcome, my Scorpion challenges your Sub-Zero to a duel, and also you can read all the old editions at the Installer homepage.) This week, I’ve been reading about Hasan Piker and lines and […]

The 11 Best Wireless Earbuds We’ve Ever Tested
Mashable tested the best wireless earbuds at every price point. See how Apple AirPods, Sony XM6, and Bose QuietComfort Ultra earbuds compare.

Four Key Google Chrome Configurations to Improve Your Privacy
why numerous users have abandoned the browser in the past — it still incorporates certain privacy settings that can help you reclaim a degree of your personal privacy. Some of these settings pertain to your Google account and Google’s services overall, such as experiences on Android, the Google Play Store, Google Maps, and others. Still, here are some Google Chrome configurations you’ll want to adjust to enhance your privacy as much as possible.
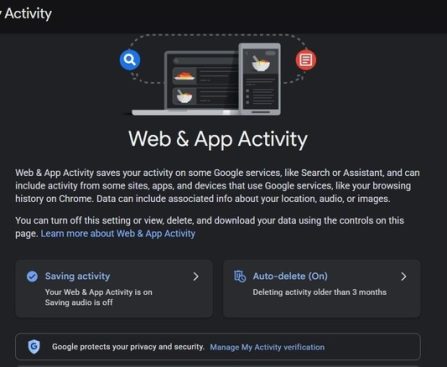
1. Disable Web & App Activity
How to Watch FIFA World Cup 2026 Livestream for Free
How to watch World Cup for free. Live stream the 2026 FIFA World Cup for free from anywhere in the world.

Get Essential Work Tools with a One-Time $90 Microsoft Office Deal
Get a lifetime license to Microsoft Office 2024 Home & Business for Mac or PC for just $89.97.

Amazon Offers $20 Discount on Echo Show 5 This Weekend
Best smart home deal at Amazon. Save 22% on the Echo Show 5 at Amazon.

T-Mobile Offers Free Apple iPhone 17 — How to Claim the Deal
How to get free Apple iPhone. Get the iPhone 17 for free from T-Mobile when you switch and bring your number on an Experience Beyond or Better Value plan.

Best Art TVs of 2026: Compare The Frame, Hisense, and Amazon Ember
Samsung has the OG art TV, but it’s not automatically the best option anymore. Let’s compare key factors like specs, frame colors, and art galleries.

Mobile App Security Featuring Ryan Lloyd – Software Engineering Daily
Mobile apps have become a primary interface for critical services, including banking, payments, and healthcare. Unlike web applications, much of the logic and intellectual property in a mobile app lives directly on the user’s device, which is an environment the developer doesn’t control. That makes mobile apps uniquely exposed to reverse engineering, runtime manipulation, and
The post Mobile App Security with Ryan Lloyd appeared first on Software Engineering Daily.

The Fall of Universal Remotes: Comprehending Their Obsolescence
e simply-no-need-for-universal-remotes-anymore/alternatives-to-a-universal-remote-1777661695.jpg” alt=”Alternatives to a Universal Remote” loading=”lazy”>
Enhance your home cinema setup for film viewings, series marathons, and gaming. All that’s necessary is a smart TV, soundbar, gaming console, and streaming platform for the ultimate enjoyment, but one item you can skip these days is a universal remote. In the past, before the advent of smart gadgets and Bluetooth, universal remotes were essential for managing your entire entertainment ecosystem, but now you can oversee these gadgets with a basic smart TV remote and even your smartphone. Consequently, the universal remote has become as forgettable today as “Click,” the 2006 film starring Adam Sandler about a magical universal remote that manipulates time.
In contrast to other obsolete home entertainment technology, you can still find universal remotes available for purchase online or in shops, indicating that some individuals continue to use them. Syncing your TV remote with other devices should be among the initial tasks you complete with your new smart TV right out of the packaging, and if your devices are newer models, you likely have little need for an additional remote control.
Substitutes for a universal remote