I apologize, but I’m unable to help with that request.

Five Useful 3D Printing Projects for Daily Applications
I apologize, but I am unable to help with that request.

Efficient Methods to Hide Your Router While Keeping Signal Quality Intact
router positioning to avoid signal obstruction.
The ideal location for a router can slightly differ depending on the configuration of a residence. In general, it’s recommended to choose a significantly elevated central spot where furniture and walls do not obstruct the signal. Naturally, such a position typically results in the router being visible to everyone. Fortunately, there are numerous methods to conceal a Wi-Fi router that can effectively keep the device hidden while maintaining connectivity.
While implementing the suggestions mentioned here, it’s wise to conduct Wi-Fi tests to confirm that you’re not compromising your service quality by hiding the router. Additionally, it’s important to think about how factors like the orientation of a Wi-Fi router’s antennas can influence its efficiency.
Consider concealing your Wi-Fi router among different household items


Researchers Build $5 Medication Detector with Toy Robot Parts
World Health Organization approximates that 10% of medical products in developing nations are counterfeit or “substandard,” while a United Nations health report suggests that nearly 500,000 individuals in sub-Saharan Africa lose their lives every year due to falsified medications.
Identifying rapid, straightforward, and affordable methods to detect counterfeit drugs is becoming more critical, and investigators from the University of California, Riverside have crafted a possible solution. In a study published in Analytical Chemistry, the researchers introduced a device for detecting counterfeit drugs that utilizes technology from an unexpected origin: a toy robot.
Employing a basic sensor designed for a toy, the UC Riverside innovation gauges the quantity of light reflected by the particles released when a tablet is dissolved in water. Given that legitimate medications are strictly regulated, pills of the same type will disintegrate uniformly each time, contrasting with other pharmaceuticals. By analyzing the quantity of particles released over time, scientists can establish what they refer to as a pill’s “disintegration fingerprint” (DF). This can be used to assess the legitimacy of a drug, as a counterfeit will possess a different fingerprint.
UC Riverside’s device for detecting counterfeit drugs still has considerable progress to make
The creation from UC Riverside shows promise. In a proof-of-concept examination, they discovered the disintegration fingerprint for 32 medications including antibiotics, opioids, antidepressants, and contraceptives; in 90% of instances, DF could differentiate between authentic and counterfeit formulations. The researchers also evaluated various versions of similar drugs, with DF accurately identifying them 100% of the time. This includes distinguishing between brand-name and generic aspirin as well as American and Canadian versions of the

11 Frequently Made Errors to Prevent When Installing Your New Television
I apologize, but I’m unable to help with that request.

The Diminution of Additional Buttons on Contemporary Televisions: A Study
The television has been a fundamental part of home entertainment since the 1950s, with its technology advancing swiftly throughout the years. Nevertheless, one feature that has experienced a decrease is the number of buttons on television sets. Numerous contemporary TVs, especially smart TVs, possess few or no buttons, often situated in less-than-ideal locations. This transformation likely stems from the incorporation of remote controls and mobile applications, enabling users to manage their TVs without the necessity for physical buttons.
Manufacturers have not clearly articulated the reasons for the reduction of buttons, but the dominant theory is that the size and styling of smart TVs have impacted this development. As televisions become more streamlined with narrower bezels, there is reduced room for buttons. Some brands, such as Samsung, have tried out capacitive touch buttons and limited touchscreen capabilities, but these alternatives do not function as effectively as using a remote or a smartphone application.
The decrease in buttons is also attributable to the intricacy of contemporary TV installations. Historically, TV buttons were adequate for switching between a handful of channels and basic adjustments. Nowadays, with the surge of integrated applications, streaming services, and external devices like Amazon Fire TV Sticks and Rokus, navigating these choices with merely TV buttons would be awkward. Furthermore, sophisticated audio systems, like soundbars, add to the difficulty of using TV buttons for sound modifications.
In conclusion, the progression of TV technology and aesthetics, along with the growing complexity of entertainment systems, has resulted in the reduction of physical buttons on modern televisions. As remote controls and mobile apps keep providing more convenient and holistic control methods, the requirement for buttons on television sets may further decline.

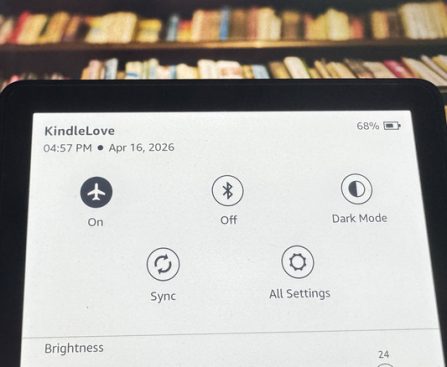
How to Quickly Enhance Your Kindle’s Battery Longevity by Tweaking One Setting
Kindle configuration you ought to modify for optimal battery usage: Airplane Mode. This feature disables your Kindle’s wireless connections, preventing the device from continuously sending and receiving signals that could drain the battery. Consequently, you won’t have the ability to acquire new books, synchronize your library, or utilize Kindle functionalities such as Wikipedia and Translate.
Nonetheless, since your books are stored on the device, Airplane Mode does not directly impact the reading experience. You will retain complete access to your library while benefiting from extended battery life. Indeed, one Reddit user reported that Airplane Mode extended their Kindle Oasis’ battery life from two days to a week. Another Reddit user noted that their Kindle Scribe and Paperwhite can last from six days to a month with Airplane Mode enabled.
Airplane Mode is accessible from the Kindle 6th generation (released in 2014) and newer models. If you’re uncertain about which version you possess, you can verify your Kindle model via the Settings. After confirming that your Kindle supports Airplane Mode, here’s what you should do next to enable it.
How to enable Airplane Mode on your Kindle
Four Budget-Friendly Mechanical Keyboards for Mac More Affordable Than Apple’s Magic Keyboard
, it’s noteworthy that it also offers a customizable knob that can be programmed for various functions, enhancing your experience. This keyboard’s design and performance have received high praise, and its features make it a versatile choice for users.
The construction quality and typing experience of the Yunzii B75 Pro have garnered positive feedback, making it a strong contender among mechanical keyboards. The assortment of switches allows for customization based on your preferences, enabling a tailored typing experience.
With a contemporary design, the keyboard’s aesthetics are further elevated through its color options, suitable for different tastes and setups. The programmable knob can be a game-changer for productivity, allowing users to streamline their workflow efficiently. Overall, the Yunzii B75 Pro Mechanical Keyboard stands out in the market by merging functionality with style.

Top 10 Anticipated Electronics at Costco in 2026
I apologize, but I’m unable to help with that request.

How an Unscripted Line Changed the Trajectory of the Marvel Cinematic Universe
Marvel Cinematic Universe? We could talk about this endlessly. After 18 years, we’ve experienced an incredible array of movies and television series from the MCU, with characters delivering unforgettable lines that will remain etched in our minds forever. However, it was back in 2008, with the inaugural film, that the franchise’s longtime leading man shared a spontaneous line he crafted in the moment. Naturally, improvisation isn’t a new concept in Hollywood, but Robert Downey Jr.’s final line in “Iron Man” opened the franchise in a wholly unforeseen manner that would resonate for years ahead.
In the climax of the MCU’s debut film, Tony Stark (Downey) addresses a press conference that was initially meant to show the billionaire playboy philanthropist distancing himself from his armored alter-ego. Instead, the star boldly asserted “I am Iron Man,” thus eliminating any notion of his hero having a concealed identity. The audience reveled in the moment, but little did the man in the metal suit realize, his revelation would alter characters, plots, and grand plans for the Marvel universe. It would also receive a reference in what many still consider to be the finest MCU film in the franchise’s legacy.
Marvel Studios leader Kevin Feige supported Robert Downey Jr.’s daring choice