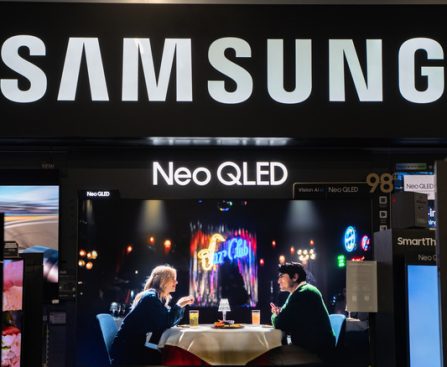
Factors Leading to the Decrease of Integrated Webcams in the Majority of Monitors

We may earn a commission on purchases made through links.

Whether you’re in a Zoom meeting or catching up with friends on Discord, having a webcam is crucial for anyone using their computer for work or social interaction. Moreover, most webcams come equipped with noise-canceling microphones, meaning there’s often no need for an extra device to minimize background noise during video calls. Despite this evident convenience, you might have observed that while premium monitors can be impressive, they generally lack a built-in webcam.

This might seem surprising considering webcams are typically standard on laptops. However, there’s a rationale behind manufacturers’ decision to largely omit webcams from monitors. A significant factor is the availability of external webcams, which usually provide superior quality and adaptability. Given the relatively low cost of these cameras and the drawbacks associated with built-in options, it becomes apparent why most monitors no longer feature integrated webcams.

External webcams provide greater flexibility

Comparing Sound Quality: USB-C vs. 3.5mm Connections

USB-C Vs. 3.5mm – Which Port Provides Superior Audio Quality?

Take a stroll, and you’ll likely notice many individuals sporting wireless headphones, particularly AirPods and Marshall’s Major V. Even though smartphones have largely eliminated wired earbuds, there’s a resurging trend indicating that wired headphones are returning. However, when you opt for wired headphones, you must decide between a classic 3.5mm headphone jack or the newer USB-C port, which leads to the question: which one is better? Nearly every audiophile will tell you that the answer lies in a digital connection accompanied by a high-quality external Digital-to-Analogue converter (DAC), commonly via a USB-C adapter or device where you attach your usual 3.5mm headphones.

Nonetheless, the answer revolves more around the DAC than the port. A 3.5mm jack depends solely on the internal audio hardware of the device, including its DAC and amplifier, while USB-C generally transmits the audio as a digital signal without converting it, assigning that responsibility to an external DAC, whether that’s in a dongle (adapter) or integrated into the headphones. This implies that USB-C can provide superior audio configurations, offering clearer sound, increased power, and reduced distortion, but this is contingent upon the quality of the external hardware.

For the majority of users utilizing standard headphones or included adapters, the difference is minimal enough that overthinking it isn’t necessary. Nevertheless, comprehending the distinctions between analog and digital audio can assist you in determining what is preferable based on your setup and your preferences.

Analog vs. digital audio: the fundamental difference is in audio transmission

The 3.5mm headphone jack outputs analog audio, meaning your device has already transformed the digital music file into a signal that your headphones can replicate. In this case, the audio quality hinges entirely on the device’s built-in DAC and amplifier, designed for everyday use rather than high-fidelity audio performance.

With USB-C, the signal remains digital for an extended period. Instead of converting the audio within the phone, the outcome relies on what you connect to it, whether a dongle, USB-C headphones, or a dedicated external DAC. That being said, using USB-C configurations can achieve higher audio quality, as external DACs do not face the same constraints of size, power, or cost as a smartphone’s internal components or other devices. However, this also implies that achieving better sound might come at a higher cost, as additional components are involved in the process.

Ultimately, with a 3.5mm jack, the sound quality is determined by the phone, while with USB-C, the outcome is contingent upon the quality of the external hardware, whether it’s the adapter, the DAC, or the headphones. In simpler terms, analog audio is consistent, while USB-C offers greater flexibility for an enhanced experience.

Here’s how audio setups leverage analog and digital outputs

Smartphone manufacturers generally eliminated the 3.5mm headphone jack to conserve space, enhance water resistance, and promote wireless audio. Consequently, modern smartphones have transitioned audio into a modular system, as the file conversion occurs in whatever device it’s connected to. Observing professional audio equipment clarifies this point.

For instance, audiophiles utilize specialized DAC/amp units like the Chord Mojo 2 for exceptional audio quality. These high-end setups typically favor USB-C connections because separating the DAC from the source permits better components, more power, and finer control over sound quality. In contrast, a 3.5mm jack operates as a closed system and remains restricted by the device’s internal hardware, whether it be a laptop, tablet, or speaker.

In summary, USB-C won’t magically enhance your music’s sound quality. It’s also dependent on the source, be it a music streaming service, a proper uncompressed file, and the equipment you are using. This is why, for most users, the distinction between 3.5mm and USB-C doesn’t carry much significance, as many aren’t eager to invest considerable money. Still, if you seek to elevate your listening experience, a digital connection with a quality external DAC is the optimal solution.

MacBook Function Offers Accurate Battery Replacement Timing

In contrast to common understanding, you cannot recharge lithium-ion batteries endlessly, not even in MacBooks. Eventually, you will have to swap out the battery in your laptop, if not the whole device – this need arises sooner if you maintain poor daily habits with your laptop. While there are numerous indicators that your battery is nearing the end of its life, MacBooks can actually provide an estimate of how much battery life remains. Or at least approximate it based on the total power cycles. As per Apple, you can gauge your laptop battery’s remaining lifespan through the System Information menu on your computer. To find this information:

– Press and hold the Option key and click on the Apple menu.
– Choose “System Information.”
– Expand the “Hardware” dropdown menu, and then click on “Power.”

The data you need is labeled “Cycle Count,” found under “Health Information.” This section will also inform you about the battery’s condition and whether it is experiencing a decline in charge capacity (shown under “Maximum Capacity”).

The “Cycle Count” detail is quite straightforward, as it merely presents a number. Apple also offers a comprehensive list of the “Maximum Cycle Count” applicable to each MacBook model, which indicates the maximum instances you can safely charge the battery. For example, if you possess an M5 Max MacBook Pro (considered one of the finest models available today), and your “Cycle Count” reads 126, you still have a substantial amount of time before needing to replace your MacBook’s battery.

One full charge doesn’t equate to one battery cycle.

When you encounter the term “battery cycle,” you might think it signifies that each time you recharge your battery, it counts as one cycle. Nonetheless, the chemistry of a rechargeable lithium-ion battery operates differently. Apple clarifies that a battery charge is determined by how much power the charger replaces. Suppose one day you utilize 90% of the MacBook’s battery and then recharge it overnight. This does not constitute a full battery cycle but rather 90% of one — although the System Information menu won’t indicate this.

However, the next instance your laptop operates on battery power and is afterwards plugged in, as long as you consume at least 10% of the stored energy, your MacBook will acknowledge it as one entire battery cycle. While many may suggest that leaving a laptop plugged in all the time is unwise, you can do so, provided your MacBook is running macOS Catalina 10.5.5.

This update introduces an option to enable “optimized battery charging,” which limits the battery charge to 80%. You will need to recharge it more frequently once you unplug the laptop, but battery cycles won’t accumulate as rapidly since the computer is not reaching full charge. Always ensure your MacBook is running the latest macOS (and rectify it if it isn’t) to receive more beneficial updates like this.

Creative Methods to Leverage Your PC’s Ethernet Port Apart from Router Connectivity

utilize the Ethernet port on your computer to share internet access with another device. Beyond this, the port can facilitate the transfer of large files between computers in mere minutes, connect to older, non-wireless printers, and create a dedicated LAN for gaming.

As we rapidly advance towards wireless technologies, Ethernet continues to offer substantial advantages, which we aim to leverage. Ethernet frequently provides faster speeds, greater stability, and reduced susceptibility to interference. Moreover, it can carry signals over extended distances, particularly when wireless connections begin to falter. The greatest advantage of effectively employing your computer’s Ethernet port is that it doesn’t necessitate expensive acquisitions or significant effort. A few Ethernet cables and some quick adjustments to system settings, where needed, will suffice.

Quicker file transfers between computers

Reasons USB Sticks Are the Best Option for Playing Music in the Car

USB Drives Could Be The Optimal Method For Enjoying Music In Your Vehicle – Here’s The Reason

Some individuals will never experience the joy of curating a mixtape — a genuine cassette mixtape — or converting your preferred playlist onto a CD prior to setting off. Both were oddly pleasurable, but they also infused a unique charm into music playlists. Of course, today you can launch an app, select a bunch of songs with a few taps, and be on your way. However, if you wish to enjoy music in your vehicle, Bluetooth isn’t the most effective means to do so. The wireless connection is handy and quick, but you’ll receive far superior audio quality if you connect your phone directly to the system using USB. There’s another method that closely resembles the mixtapes of the past. You can utilize a USB drive and fill it with your favorite tracks.

Why is this? Firstly, depending on your music source, you may not have to subscribe to any services to listen. Furthermore, you can play FLAC and lossless audio with their authentic fidelity through USB. Bluetooth fails to support lossless audio except via very specific codecs, such as Qualcomm aptX Lossless.

Additionally, you have the freedom to create your own collection, including any artists, tracks, genres, and playlists you desire. With the high capacities of USB drives, you can store a substantial amount of music on a solitary drive. A 256GB USB drive can accommodate over 83,000 songs at 3MB each. You can also detach the USB at any time to add additional tracks, or keep it connected to your car’s port permanently. Most vehicles provide this capability, but if your car lacks a USB port, you will require an adapter or a device with an aux-output like a DAC. If your car’s USB port is malfunctioning, you will need to address that issue first.

How to transfer music to a USB drive for playback in your vehicle?

I strongly suggest loading a single MP3 or music file onto your new USB drive and testing it in your car before adding a multitude of tracks. Aim to use the file format that you will mostly have, whether that is MP3, AAC, OGG, FLAC, or another format. Ensure to format the USB drive using a standard file system, such as FAT or FAT32. Transfer a single track to the drive when it’s prepared, connect it to your car’s audio-related USB port, as there might be several USB ports available, and be sure to select the right input. If the track plays successfully, you’re ready to proceed. Make certain you use the same file format for forthcoming tracks.

It’s also advisable to organize the tracks on the drive, rather than placing them all in a single root directory. It’s beneficial to establish a logical structure, with folders such as artist > album for each group or artist. You may be able to use your phone for this, but managing it will be simpler on a computer or laptop. It is undoubtedly easier to arrange the file structure using a computer. Once your music is transferred and structured, you’re all set.

Besides playing music, there are some really exciting gadgets you can use in your vehicle’s USB port, even some that enhance your car’s safety, but nothing quite as enjoyable as crafting your own playlists and experiencing high-fidelity audio while driving along the highway.

How to Supply Power to an Apple TV via Your TV’s USB Port

a solid option for many individuals in 2026, including those who are part of the Apple ecosystem and privacy-aware users who prefer to minimize smart TV surveillance. Nonetheless, unlike certain popular streaming devices, especially those designed in a stick format that can draw power from your smart TV’s USB port, the Apple TV is exclusively dependent on AC power and cannot be powered via a TV’s USB port.

Apple TV is equipped with its own integrated power supply unit (PSU), which receives power from a wall outlet through a barrel plug. It accommodates voltages ranging from 100 volts to 240 volts at 1 ampere, converting that into approximately 13W DC power, which is used by the other components of the Apple TV to provide everything from your favorite streaming platforms to Apple Arcade games on your TV.

In contrast, the majority of TVs feature USB 2.0 or USB 3.0 ports, which can only supply 2.5W or 4.5W of DC power, respectively. Neither of these USB power outputs can meet or fulfill the power demands of Apple TV devices. Consequently, it’s advisable to connect your Apple TV streaming device directly to an AC power outlet. However, accessory manufacturer Mission Cables provides a solution in the form of its <a href="https://r.bttn.io?btn_ref=org-225e4e0aac880b8f&btn_url=https%3A%2F%2Fwww.amazon.com%2Fdp%2FB0DJDQHHW8%3Ftag%3Dstaticmedia-bgr-custom-20&btn_pub_ref=2137171-in

Factors That Generally Cause Desktop PCs to Endure Longer Than Laptops

habits that may harm your laptop or its battery. With a PC being entirely stationary, you do not need to be as cautious.

Additionally, there’s the issue of heat management. PCs offer superior cooling, while most laptops make certain sacrifices to fit their slim designs and reduced sizes. This is particularly evident when compared to a PC, where you can install several cooling fans. This is a key reason why investing in a laptop cooling pad is advisable to enhance its lifespan.

Repairability and enhancements for future-proofing

Cost-effective PC Enhancements You Can Implement Right Now

Upgrading a PC, whether for gaming or other uses, can be challenging when it comes to managing expenses. The current landscape of memory, GPUs, and storage is heavily pressured on the consumer side, primarily due to AI data centers contributing to a global chip deficit. At this time, it’s more beneficial to upgrade existing parts instead of committing to a completely new build, as the inflation driven by the growing AI sector is unlikely to diminish shortly, making it wise to endure the situation. Affordable solutions are out there for problems like thermal throttling, inadequate audio quality, and declining frame rates in recent games, so there’s no need to worry about spending four figures just yet. Each PC upgrade listed here costs less than $100 and addresses specific bottlenecks or aesthetic enhancements suitable for a restricted budget.

There are upgrades for PCs that yield noticeable improvements in performance and appearance, devoid of marketing exaggeration or exorbitant costs. By transferring frame generation to a secondary legacy GPU or using liquid cooling along with thick 38 mm radiators for enhanced CPU thermal regulation, these options enable users to avoid cloud subscriptions and “gaming tax” associated with premium components. By investing in a quality sound card or high-capacity external drives featuring 256-bit hardware encryption, users can obtain the enhancements they seek by thinking creatively.

Upgrade to liquid CPU cooling

Elevated temperatures are a primary factor in reduced performance, with standard air coolers and thin liquid radiators insufficient for controlling the rapid temperature spikes produced by modern CPUs. Investing in a solid liquid CPU cooler with appropriate specifications can unlock higher clock speeds and ensure overall stable performance. The ARCTIC Liquid Freezer III Pro 240 A-RGB retails for approximately $83 and is equipped with an extra-thick 38 mm premium radiator, which accommodates a larger fluid volume compared to other AIOs with a 27 mm thick radiator. The additional thickness enables the system to dissipate heat more effectively during demanding gaming sessions or intensive video rendering, preventing the CPU from experiencing thermal throttling.

The design of this cooler is robust for its price range, featuring an integrated VRM fan situated directly on the pump block. This compact fan delivers active cooling to the power delivery components surrounding the CPU socket, which are often left without cooling by conventional water blocks. It includes the appropriate mounting hardware for Intel LGA1851 and LGA1700 and is also compatible with AM4 and AM5 AMD Ryzen processors right out of the box. Installation is straightforward thanks to the two P12 Pro fans being pre-wired; just apply the included MX-6 thermal paste in a cross pattern and set it up.

Install a dedicated sound card

Motherboard manufacturers often advertise “high-quality” audio, which suffices for most users. However, for those who depend on output power for professional-grade headphones, wish to eliminate any electrical noise, or want to connect a surround sound system or studio monitors, onboard audio chips fall short. A sound card like the Creative Sound Blaster Audigy Fx Pro is a cost-effective solution to these problems, offering a dedicated, shielded audio pathway for $79.99. It can deliver high-resolution 32-bit / 384 kHz playback and boasts a 120 dB signal-to-noise ratio, ensuring users enjoy clearer audio with considerably less background hiss compared to typical onboard options.

Looking to connect a separate 7.1-channel analog speaker system? This sound card supports that with its SPDIF output and dedicated line-in sources, making it ideal for a home theater PC, gaming setup, and professional work. For headphone users, the Creative Nexus app features an AutoEq function, enabling users to mimic the frequency responses of various premium headphones. In simple terms, this guarantees audio is perfectly balanced for the equipment being utilized. Additionally, it’s a low-profile, half-height bracket sound card, making it suitable for everything from compact builds to large gaming rigs without hassle.

Offload frame generation to a budget GPU

With a program available on Steam called Lossless Scaling ($7.99), it’s now feasible to relieve the primary GPU of frame generation tasks and assign them to a more affordable secondary GPU instead. Use an old GPU that may be lying around or purchase a low-cost option like a GeForce GT 740 4GB for $59.99, or an Intel Arc A380 Challenger 6GB for $139.99 for the additional VRAM and DisplayPort 2.0.

To set this up, first install the secondary GPU into the bottom PCIe slot on the motherboard and connect the monitor to the HDMI or DisplayPort. After installation, obtain the necessary drivers for the secondary card, then search for Settings, navigate to System > Display > Graphics in Windows, click “Options,” and select “

Suggested Interval for Restarting Your Phone

tackle intermittent Wi-Fi issues, rebooting the problematic device is recommended. A restart may resolve the disruption preventing a certain component from functioning properly or prompt you to consider seeking expert assistance if the issue persists. The same approach should be applied to the smartphone in your pocket or bag. It is advisable to restart your iPhone or Android device regularly to keep everything operating seamlessly. You should power cycle the device occasionally even if it appears to be functioning well. This is an effective method to address any software anomalies and background activities that might be affecting performance and battery life.

This isn’t solely about rebooting your iPhone or Android phone following a software update. Typically, every time you upgrade the phone to the latest iOS or Android version, or apply a security patch, the device will restart — this is part of the update procedure. The focus here is on rebooting the device between updates, during standard use. After all, software updates can be issued every few months, regardless of the operating system.

Another factor to remember is the age of your device and the kind of model you have. Latest devices will provide a superior experience compared to older ones, as they come equipped with advanced hardware. High-end phones will also deliver quicker performance than mid-tier smartphones and entry-level models. The variations in speed may be more prominent on Android than on iPhone, since Apple’s most affordable iPhones continue to use the company’s most powerful processors. More budget-friendly Android models generally come with less powerful chips.

How often should you restart an iPhone?